Our Master bedroom has been a constant work in progress as neither Chris or I came out of college with any substantial bedroom furniture. I quickly wanted to do something to make this feel like a grown up space and something we created together. Since we cannot paint the walls in our apartment we are left with asylum white walls everywhere and desparately needed to put our stamp on the space.
Apartment Tip: Check with your landlord, some will allow you to paint your space with their approval.
I scoured the internet and reviewed fellow DIY-ers successes, looked through many inspiration design mags (as this was the pre-Pinterest days) and settled on making an upholstered headboard from plywood. As we wanted something sturdy to lead our heads against, we decided that we wanted to bolt it to the bed frame (which is optional). I've seen many great ideas where the finished product is hung from the wall above the bed or just leaning against the wall.
Materials Needed:
Staple Gun and Box of Staples (which I already had)
2 Nuts 2 Washers 2 Bolts that fit the hole in the bed frame (optional)
Quilting Batting
Fabric of Choice
Plywood board - 4x8 cut down to size of bed and height desired
Step 1: Staple Quilting batting to plywood
Pull the batting over the plywood until you reach the desired thickness you like. We had about 3 layers of batting in this project. Using the staple gun, staple the batting to the back side of your project. I secured a staple every 4 inches or so.
Step 2: Covering with your fabric of choice
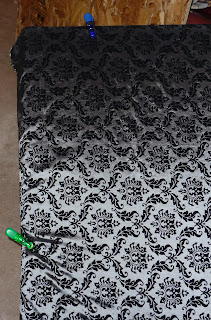
I chose a silvery/gray fabric with a flocked damask print. I would suggest ironing your fabric prior to this step to ensure all fold lines are removed. I dug around in my "junk drawer" and found these chip clips to use as aids in positioning my fabric evenly across the headboard to make sure my pattern was straight. Once your fabric is taught and in the correct position, being stapling to the plywood just as we did with the batting. Make sure to check your progress as you go to make sure your lines are still straight.
Step 3: Installing the bolts to mount the headboard to the bed frame (if you choose to hang or lean your piece you can skip this step)
This step was a little trickier as I'm much more of a "try it and see what happens" kind of person vs. someone who plans out each step. To learn from our mistake, I would mark and drill holes for the bolts PRIOR to upholstering your work of art. Yes, that's what WE did not do. Once I realized we made this mistake, it just made the marking and drilling process a little more complicated but we got the job done! For those of you readers who know my husband, you shouldn't be too surprised about the Where's Waldo appearance in this shot.
Step 4 (the best step of all) : Install headboard behind or above your bed
The best part of the project is that when we find our forever home we can change out the fabric and reuse or relocate to the guest bedroom if we redesign our new master.
Finished Look:
I've always loved the dramatic look that the contrast scarlet or other deep reds can add but didn't want it too look kitschy or overdone. With our scarlet red sheets, I purchased wall sconces for next to nothing (Gordmans) and changed out the off white candles for matching red ones that just give that extra pop of color. I never wanted a bed with so many pillows you have no where to sit, and many days I use just one and which looks a little cleaner. I have a thing for throw pillows - a lot like people hoard shoes except I have some secrets about them I'll share at a later date. As I mentioned before, the bedroom is still a work in progress and next on my list is what to do with our mismatched nightstands - more to come on those.


No comments:
Post a Comment